How to Test Aviation Cable for Capacitance: A Step-by-Step Guide
Accurately measuring the capacitance of aviation cables is a critical task for aircraft maintenance technicians, avionics engineers, and quality control personnel. Capacitance, measured in Farads (typically microfarads, µF, or picofarads, pF), indicates a cable’s ability to store electrical charge. Precise capacitance values are essential for ensuring signal integrity, preventing crosstalk, and guaranteeing the reliable operation of sensitive avionics systems like communication radios, navigation equipment, and flight control sensors. This guide details the precise methods for testing aviation cable capacitance.
Why Test Aviation Cable Capacitance?
- Signal Integrity: Incorrect capacitance can distort electrical signals, especially high-frequency signals used in data buses (like ARINC 429, AFDX) and communication systems, leading to errors or system malfunctions.
- Impedance Matching: Many avionics systems require cables with specific characteristic impedance (often 50 or 75 ohms). Capacitance is a key factor (along with inductance) determining this impedance. Mismatched impedance causes signal reflections and power loss.
- Crosstalk Prevention: Capacitance between individual conductors within a cable bundle or between twisted pairs is a primary cause of crosstalk (unwanted signal coupling). Measuring inter-conductor capacitance helps identify potential crosstalk issues.
- Fault Detection: Significant deviations from specified capacitance values can indicate cable damage, such as compromised insulation, moisture ingress, crushed conductors, or internal shorts.
- Compliance Verification: Testing ensures cables meet the stringent capacitance tolerances specified in aviation standards (e.g., SAE AS50881, MIL-DTL-27500) and aircraft maintenance manuals.
Essential Tools for Testing Aviation Cable Capacitance
- Digital Capacitance Meter (LCR Meter): This is the primary tool. Choose a meter specifically designed for measuring capacitance at the ranges typical for aviation cables (often picofarads per foot/meter). Ensure it:
- Has sufficient resolution and accuracy for your requirements.
- Offers appropriate test frequencies (e.g., 1 kHz is common for cable capacitance).
- Provides Kelvin (4-wire) test leads if high precision is needed for short cable lengths.
- Calibration Certificate: Your meter must be within its calibration period. Using an uncalibrated meter invalidates your results and compromises safety and compliance. Verify calibration status before use.
- Quality Test Leads: Use leads with sharp, well-insulated probes or clips suitable for accessing cable conductors. Ensure leads are in good condition (no nicks or breaks in insulation).
- Deuterium Lamp or Equivalent Reference: (Optional but recommended for high precision) Used to verify meter accuracy against a known standard before critical measurements.
- Technical Data: Have the aircraft maintenance manual (AMM), component maintenance manual (CMM), or applicable wiring standard (e.g., SAE AS50881) readily available. This provides the specific capacitance specifications and tolerances for the cable under test.
- Personal Protective Equipment (PPE): Safety glasses are essential. Follow all applicable workshop safety procedures. Ensure the aircraft/circuit is electrically safe (powered down, locked out) before connecting test equipment.
Step-by-Step Guide to Testing Aviation Cable Capacitance
1. Preparation is Key:
* Safety First: Confirm the aircraft or relevant circuit is powered down. Apply appropriate lockout/tagout procedures. Disconnect the cable from any avionics units or connectors at both ends.
* Consult Documentation: Identify the specific cable assembly or wire type you need to test. Locate the exact capacitance specification and tolerance from the AMM, CMM, or wiring standard.
* Prepare the Cable: Ensure the cable ends are clean and accessible. You need to make contact with the individual conductors you are testing. If necessary, carefully strip a small amount of insulation from the ends, ensuring no strands are broken or nicked. For connectors, access the appropriate pins/sockets.
* Prepare the Meter: Power on the capacitance meter. Select the capacitance measurement function (C or Cap). Choose the appropriate range if not auto-ranging. Allow the meter to stabilize if required. Perform a quick verification: Short the test leads together and press the “Zero” or “Relative” (REL) button. The display should read near zero (accounting for lead capacitance). If using a reference standard, verify meter accuracy against it.
2. Measuring Conductor-to-Conductor Capacitance (Twisted Pairs, etc.):
* Identify Conductors: Determine which two conductors within the cable you need to measure the capacitance between (e.g., the two wires of a twisted pair).
* Connect Leads: Attach one meter test lead firmly to the first conductor. Attach the other meter test lead firmly to the second conductor. Ensure good metal-to-metal contact. Keep the test leads separated and avoid letting them touch each other or other objects.
* Read Measurement: The meter will display the capacitance value between the two conductors. Record this value accurately, including the units (usually pF).
* Interpretation: Compare the measured value against the specification range. Ensure it falls within the allowed tolerance.
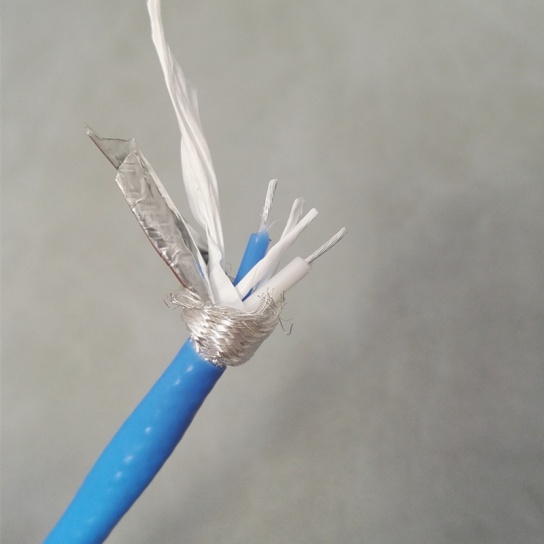
3. Measuring Conductor-to-Shield Capacitance (Shielded Cables):
* Identify Components: Identify the center conductor(s) and the cable shield (braid or foil).
* Connect Leads: Attach one meter test lead to the center conductor. Attach the other meter test lead to the cable shield. Ensure good contact with the shield – you may need to twist the braid or use a special shield clamp.
* Read Measurement: The meter displays the capacitance between the conductor and the shield. Record this value.
* Interpretation: Compare against the specification.
4. Measuring Capacitance to Ground:
* Connect Leads: Attach one meter test lead to the conductor being tested. Attach the other meter test lead to a known, reliable aircraft ground point (e.g., aircraft structure ground stud). Ensure the ground connection is clean and secure.
* Read Measurement: The meter displays the capacitance between the conductor and ground. Record this value.
* Interpretation: Compare against the specification. This is often important for antenna cables or lines susceptible to noise.
Critical Best Practices & Tips
- Zero the Leads: Always null out the inherent capacitance of your test leads before taking a measurement using the meter’s REL or Zero function.
- Minimize Lead Influence: Keep the test leads short and separated. Avoid coiling them. Their own capacitance can affect readings, especially on very low capacitance measurements.
- Stable Environment: Perform tests in a stable temperature environment if possible. Capacitance can be slightly temperature-dependent.
- Isolate the Cable: Ensure the cable under test is completely isolated from other circuits and components. Other nearby conductors or grounded structures can influence the reading (stray capacitance).
- Firm Contact: Ensure solid electrical contact with the conductors. Poor contact leads to erratic or incorrect readings.
- Record Everything: Document the cable identifier, measured capacitance value, units, test date, meter used (and calibration due date), and tester name. Compare results directly against the specification.
- Troubleshooting Out-of-Tolerance Readings:
- Re-check Connections: Ensure perfect contact and isolation.
- Re-zero Meter: Perform the lead zeroing procedure again.
- Check for Damage: Visually inspect the cable along its entire length for kinks, crushing, cuts, or signs of overheating. Pay attention to areas near clamps or connectors.
- Check for Moisture: Moisture ingress is a common cause of increased capacitance. Inspect connectors and cable jacket for breaches.
- Verify Specification: Double-check you are using the correct specification value for that specific cable type and length.
- Consult Expertise: If the cause isn’t readily apparent, consult senior technicians or engineering support.
Conclusion
Testing aviation cable capacitance is a fundamental procedure for maintaining the safety, reliability, and performance of aircraft electrical systems. By following the steps outlined above – prioritizing safety, using calibrated equipment, adhering to technical specifications, and employing meticulous measurement techniques – aviation professionals can accurately assess cable health, diagnose potential faults, and ensure compliance with rigorous aviation standards. Consistent and accurate capacitance testing is a cornerstone of effective aircraft maintenance and quality assurance programs.